From Chickpea Water to Cloud: Mastering Aquafaba Mousse Techniques
Who would have thought that the humble liquid drained from a can of chickpeas could transform into a dessert so ethereal, so decadent, it rivals its egg-and-dairy-laden counterparts? Welcome to the surprising and delightful world of aquafaba mousse – a vegan marvel that’s not just a substitute, but a showstopper in its own right. What once might have been discarded chickpea water is now celebrated as the star ingredient in luscious, airy creations, most notably a rich and silky aquafaba chocolate mousse.
My own kitchen journey, much like many home cooks driven by dietary needs or a passion for innovation, led me down this fascinating path. Navigating challenges like egg allergies, I discovered the magic hidden within chickpea brine – a secret ingredient capable of delivering a reliably glossy, cloud-like dessert. This guide promises to demystify the techniques, decode the sensory cues, and equip you with the confidence to whip up an indulgent, dairy-free treat from pantry-friendly ingredients. From selecting the right aquafaba to perfecting the delicate fold, we’ll uncover the secrets to transforming a simple liquid into a dessert that everyone will ask for.
The Magic of Aquafaba: From Viscous Liquid to Voluminous Foam
At its core, the success of aquafaba mousse relies on the unique properties of chickpea water. This viscous liquid, rich in starches, proteins, and saponins, acts remarkably similarly to egg whites when whipped. These compounds create a stable, aerated foam, providing the crucial lift and structure for your mousse.
The quality of your aquafaba is paramount. For consistent results, opt for the clear, relatively viscous liquid from a can of chickpeas. Avoid any thick, starchy sludge that might sometimes appear, as this can inhibit proper aeration. If you prefer to cook chickpeas from dry beans, simply reserve the cooking liquid. Allow it to chill completely, then skim off any fat or surface foam, as these can act as foam inhibitors. The clearer and more viscous the liquid, the better its whipping potential.
Achieving the perfect foam is the bedrock of a successful mousse. Begin with a meticulously clean, preferably metal, mixing bowl and beaters. Any grease residue, no matter how small, can prevent the aquafaba from whipping effectively. Room temperature aquafaba tends to whip up faster and achieve greater volume than cold. Whip the aquafaba vigorously – a stand mixer with a whisk attachment or a powerful hand mixer is your best friend here, as it requires sustained effort. While hand whisking is possible, prepare for a workout!
Observe the transformation: initially bubbly and translucent, the aquafaba will soon thicken, become opaque, and gradually form peaks. You’re aiming for glossy, stiff peaks that hold their shape firmly when the whisk is lifted. A tactile test is invaluable at this stage: the foam should feel slightly tacky to the touch but not sticky, and appear smooth and pale, free from any grainy texture. If it feels too wet, continue whipping; if it starts to look dry and crumbly, you've gone too far, and the foam may start to break down.
Sugar plays a dual role here, not just for sweetness but as a vital stabilizer. Granulated sugar is a reliable choice because its fine crystals dissolve quickly, helping to strengthen the foam structure. Introduce it gradually once soft peaks begin to form. While powdered sugar or liquid sweeteners can be used, be prepared for subtle shifts in texture and potentially slightly less stability, as they can impact the delicate foam network differently.
The Art of Integration: Folding in Flavor and Form
While the whipped aquafaba provides the essential lift, the distinctive flavor profile of a classic mousse often comes from rich chocolate. Selecting the right chocolate is paramount for both taste and structural integrity. A good quality dark chocolate, typically with 70% cocoa solids or higher, offers intense depth of flavor without needing dairy. Higher cocoa percentages generally result in a firmer set and a more decadent vegan chocolate mousse, but if you prefer less intensity, a slightly sweeter bar can work – just be mindful that higher sugar content in the chocolate itself can sometimes subtly affect foam stability.
The biggest pitfall often lies in the integration of the melted chocolate. It’s a delicate dance of temperature. Your chocolate should be melted until completely smooth and pourable, but crucially, it must be only just warm. If the chocolate is too hot, it will melt and deflate the delicate aquafaba foam, resulting in a dense, heavy mousse. If it's too cool, it can seize or become lumpy when introduced, leading to an uneven texture. The goal is a pourable consistency that is closer to room temperature than hot, allowing it to seamlessly combine without causing thermal shock to the foam.
Once the aquafaba is whipped to perfection and the chocolate is at the ideal temperature, the folding technique becomes critical. This is where the mousse’s characteristic cloud-like texture is preserved. Gently introduce a small amount of the melted chocolate into the whipped aquafaba first, folding it in to lighten the chocolate mixture slightly. Then, pour the remaining chocolate over the aquafaba foam. Using a large spatula, carefully lift the aquafaba foam from the bottom of the bowl and fold it over the chocolate, repeating this motion until just combined. The key is to work quickly but gently, ensuring maximum volume retention. Over-mixing will deflate the foam, leading to a less airy texture.
For those navigating specific dietary needs, this step is particularly empowering. This isn't just a dessert; it's a testament to culinary innovation, offering a delightful egg allergy solution: silky dairy-free aquafaba mousse that everyone can enjoy, free from common allergens.
Mastering the Sensory Cues: Troubleshooting Your Aquafaba Mousse
Even seasoned cooks encounter challenges, but with aquafaba mousse, success often hinges on reading the subtle sensory cues. My own journey, fraught with weepy desserts and deflated hopes, taught me that these small observations make all the difference between a triumphant dessert and a less-than-perfect one. Think of it as learning a new language – the language of foam structure and perfect consistency.
During the whipping stage, watch for that crucial moment when soft peaks begin to droop slightly but then firmly hold their shape. This indicates a strong, stable foam ready for chocolate. If your aquafaba remains stubbornly liquidy, recheck your bowl for grease or ensure your liquid isn't too thin. If it starts to look grainy, you might have over-whipped it, causing the proteins to tighten too much, or your sugar might not have fully dissolved. A smooth, pale, and glossy appearance is your ideal.
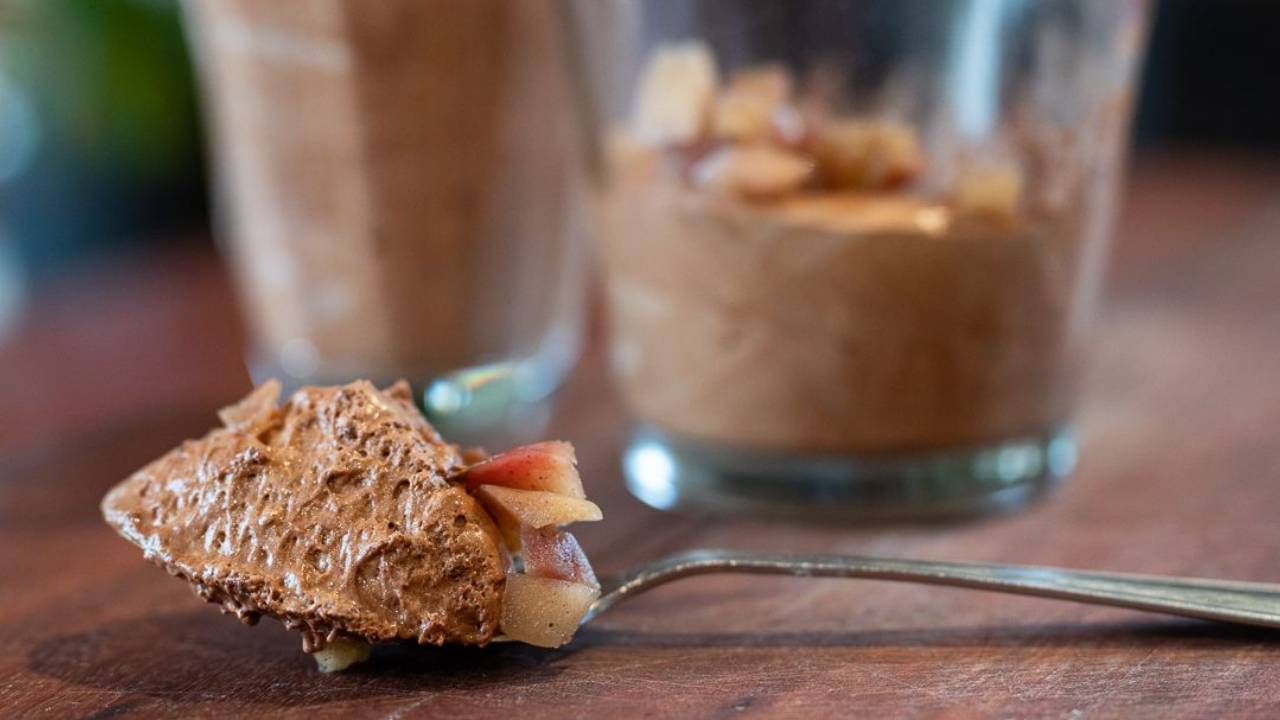
After folding in the chocolate, the mixture should have a uniform, airy consistency. When spooned, a 'ribbon' of mousse should settle slowly and evenly into a uniform surface, rather than sinking immediately or leaving distinct peaks. If the mixture feels too thin, it might be that your chocolate was too hot, deflating the foam, or your folding was too vigorous. Conversely, if it's too thick and lumpy, your chocolate might have been too cool or not fully melted.
The finished mousse, once thoroughly chilled, should be light but still spoon-coating, with a delightful melt-in-your-mouth texture. If it's weepy or separated, it often points back to either the aquafaba not being whipped enough, the chocolate being too hot, or over-folding. Embrace the journey and don't be discouraged by initial attempts. Like learning to discern when bread dough has reached its perfect proof, mastering aquafaba mousse comes with practice and keen observation. If you want to delve deeper into these nuances and achieve that sought-after gloss, explore our guide on how to master perfect aquafaba mousse: glossy vegan dessert tips.
Elevating Your Aquafaba Mousse: Customisation and Care
Once you've mastered the foundational techniques, the world of aquafaba mousse opens up to endless customisation. The chocolate version is a classic for a reason, but don't be afraid to experiment and make it your own.
Beyond traditional chocolate, consider infusing your mousse with other delightful flavors. A dash of vanilla extract or paste can enhance the chocolate notes, while a hint of instant espresso powder can deepen them dramatically. For a citrusy twist, fold in a teaspoon of orange zest or a few drops of food-grade orange oil. Peppermint extract creates a refreshing variation, perfect for festive occasions. You can also experiment with different types of plant-based milks or creams if you want to add an extra layer of richness, though this will change the texture slightly.
One of the greatest advantages of aquafaba mousse is its make-ahead potential. Once prepared and gently folded, transfer your mousse to individual serving dishes or a larger bowl. Cover them tightly with plastic wrap and chill in the refrigerator for at least 4-6 hours, or ideally, overnight. This chilling period is crucial for the mousse to set properly and allow the flavors to meld. It sets beautifully overnight and, when kept well-chilled, maintains its cloud-like texture and stability for several days, making it an ideal dessert for entertaining.
When it comes to serving, presentation matters. Fresh berries, particularly raspberries, provide a vibrant color contrast and a tart counterpoint to the rich chocolate. A dollop of dairy-free whipped cream (coconut cream works wonderfully) or a sprinkle of chocolate shavings elevate both the visual appeal and the texture. This not only makes for an impressive dessert but also champions a zero-waste approach, transforming a typically discarded liquid into culinary gold, embodying both innovation and sustainability.
Conclusion
From the humble chickpea can to a truly spectacular dessert, the journey of mastering aquafaba mousse is a testament to culinary ingenuity and mindful eating. It's a surprisingly simple yet profoundly rewarding process that proves deliciousness doesn't need to rely on traditional ingredients. By understanding the unique properties of aquafaba, respecting the delicate balance of temperature when integrating chocolate, and honing your sensory awareness, you can consistently achieve a light, airy, and deeply satisfying vegan dessert.
With these techniques, sensory cues, and a sprinkle of confidence, you're now equipped to create an aquafaba mousse that is not only exquisitely delicious and dairy-free but also a delightful conversation starter. So go ahead, whip up some magic, and share the surprising joy of chickpea water transformed into cloud-like bliss.
